
Well most of the times that your pen drive get's infected is usually due to plugging in a previously infected pendrive to a PC and then plugging yours to the same.
If you've got your "Folder Options" missing, "Regedit" missing or your usb devices not opening in Windows Explorer, it's most usually because you're infected with a virus.
Well, an anti-virus scan and a spyware removal tool would help you get rid of the virus, but then you've got to be careful not to get infected again!
Most viruses spread by utilizing the autorun.inf file that autmatically runs every time you plug-in your pen drive to your computer. They configure the autorun file to launch the virus-executables that may be bundled along with the autroun.inf file on your pendrive. And thats how they spread from machine to machine, cripplings systems along the way.
So how I'll try to help you here is by disabling the autorun feature which would minimize the chances infection considerably incase an infected pendrive is plugged into your comp.
Also, we'll see how to prevent viruses from infecting pen drives that are plugged into your computer.
1. Disabling the Autorun feature.
Simply fire up your registry editor. (Start>Run>regedit)
Navigate to HKEY_CURRENT_USER\Software\Microsoft\WindowsNow double click the value ""NoDriveTypeAutoRun" and set the Hex value to "ff" or the Decimal value to "255".
\CurrentVersion\Policies\Explorer
Hit F5 (to refresh your registry editor) and you're done.
Autorun.inf will no longer be executed automatically.
2. Prevent Autorun.inf files being writted to your pen drives.
All you've got to do here is create a folder named "Autorun.inf" without the quotes!
(Headover to folder options and unhide file extensions incase it isn't already.)
These files should prevent malicious autorun files from infecting your pendrive.
Thats it! :)
These 2 steps should minimize (if not immunize) your pendrives from viruses to quite an extent!
Incase you still need some more help on this topic, ask away!
Showing posts with label Guides. Show all posts
Showing posts with label Guides. Show all posts
Saturday, April 4, 2009
Protect your Pen-drives from viruses by disabling autorun!
Thursday, November 13, 2008
Image to text converter
Ever wondered how those bits of text were written to look like an image?
For examle:


Well its very easy using TIM Text to image Converter!
This neat little bit of code developed by the coders at donationcoders.com works great at this purpose!
You can check out the original page of this software here.
The download link in the previous link requires you to download two separate files and then extract the contents of one into the other for it to work.
I've simplified that for you by already doing the extraction part and hosting the ready product.
You can download it from here. UnRar and run Tim.exe to use!
The program converts an image (jpg or bmp) to a text, which looks like the image in grayscale. You can choose any monospaced font and any font size you want to format the text with, and also any set of allowed characters. The result can be saved as text and then you can format it correctly in a text editor, or you can save the image of the text already correctly formatted.
You could also save your converted results in an image format (jpeg, gif) just as I have done in the above image.
If you are unsatisfied with the result of your converted image;
Try to change color mapping so that the line is more steep, it improves contrast. Look at the histograms to decide where the line should lie. You could also play with the color sliders.
What works best for me is, bloating up the source image to a higher resolution and then converting the enlarged image.
Another very impressive converter is an online one; TEXT-IMAGE.com
You can choose between HTML, ASCII and Matrix output results for your image.
Again, if you are unsatisfied with your result, enlarging the image will help.
If you do happen to know of any other more efficient converter, I'd be pleased to know. Do leave details in the comments for this post. Thanks and keep coming! :)
Saturday, September 13, 2008
My list of 11 must-have applications!
Here is a list of 11 must-have applications for your computer! The list includes applications that are required for system-maintenance, security and better functionality.
I personally recommend the following and if you look around on the net, you'll find many others agreeing with the same. However, if you've got more effective applications do let us know and we could feature it here!
Attached, are direct download links and also the respective websites of each of the applications.
So lets get going..
In no particular order..
1. CCleaner

CCleaner is a freeware system optimization, privacy and cleaning tool. It removes unused files from your system - allowing Windows to run faster and freeing up valuable hard disk space. It also cleans traces of your online activities such as your Internet history. Additionally it contains a fully featured registry cleaner. But the best part is that it's fast (normally taking less than a second to run) and contains NO Spyware or Adware! :)
The best part about CCleaner is that it works as Disk Cleanup, Registry-cleaner, uninstaller and Startup items remover, all in one! Just run this nifty application around once a week or whenever your feel your PC has slowed down and stay clean! :)
Website | Download
Website | Download
2. Firefox
 Why use FireFox when you've already got IE installed on your pc?
Well maybe going through the definitions for IE on urbandictionary.com would help.
Clickie here to view them!
The first one reads:
There are just so many that I'd rather just post a link here mentioning the same:
http://www.mozilla.com/en-US/firefox/features/
Also, with Firefox you could use the tweak I've mentioned in earlier posts to get your webpages to load faster!
Website | Download
 Why use FireFox when you've already got IE installed on your pc?
Well maybe going through the definitions for IE on urbandictionary.com would help.
Clickie here to view them!
The first one reads:
I could only go on and on and on as to why one should use Firefox.
There are just so many that I'd rather just post a link here mentioning the same:
http://www.mozilla.com/en-US/firefox/features/
Also, with Firefox you could use the tweak I've mentioned in earlier posts to get your webpages to load faster!
Website | Download
3. MozBackup

MozBackup is a simple utility for creating backups of Mozilla Firefox, Mozilla Thunderbird, Mozilla Sunbird, Flock, SeaMonkey, Mozilla Suite, Spicebird and Netscape profiles. It allows you to backup and restore bookmarks, mail, contacts, history, extensions, cache etc. It's an easy way to do Firefox backup, Thunderbird backup ...
As mentioned in my earlier post, this nifty little application is very useful when you need to carry your bookmarks from one pc to another. Also, backing up your bookmarks can be very important if you bookmark a lot. I regard this app as a lifesaver since I'm always bookmarking stuff and I've got around 200bookmarks already. :P
4. Flashget

FlashGet is a leading download manager and has the highest amount of users on the internet. It uses MHT(Multi-server Hyper-threading Transportation) technique, supports various protocols and has excellent document management features. FlashGet is a freeware without any adware or spyware.
I do most of my downloads from torrents so I rarely need a download manager. But whenever I do, its FlashGet. Fast, Efficient, Light and Easy. No Ads, thats another blessing with this download manager. Also, the tiny download-stat-box that you can move around your desktop looks neat. :)

FlashGet is a leading download manager and has the highest amount of users on the internet. It uses MHT(Multi-server Hyper-threading Transportation) technique, supports various protocols and has excellent document management features. FlashGet is a freeware without any adware or spyware.
I do most of my downloads from torrents so I rarely need a download manager. But whenever I do, its FlashGet. Fast, Efficient, Light and Easy. No Ads, thats another blessing with this download manager. Also, the tiny download-stat-box that you can move around your desktop looks neat. :)
5. uTorrent
 uTorrent is a powerful and efficient BitTorrent client for Windows. Most of the features present in other BitTorrent clients are present in uTorrent, including bandwidth prioritization, scheduling, RSS auto-downloading, and Mainline DHT. Additionally, uTorrent supports the protocol encryption joint specification and peer exchange. Unlike many torrent clients, it does not hog valuable system resources--typically using less than 6MB of memory, allowing you to use the computer as if it weren't there at all.
 uTorrent is a powerful and efficient BitTorrent client for Windows. Most of the features present in other BitTorrent clients are present in uTorrent, including bandwidth prioritization, scheduling, RSS auto-downloading, and Mainline DHT. Additionally, uTorrent supports the protocol encryption joint specification and peer exchange. Unlike many torrent clients, it does not hog valuable system resources--typically using less than 6MB of memory, allowing you to use the computer as if it weren't there at all.
Undoubtedly, the best torrent client. Very light weight and its got all the necessary features that any client should have. If you look around, you'll see that almost all teh pirates on teh net use utorrent.
6. 7-Zip/WinRar

 7-Zip
7-Zip
7-Zip is open source software. Most of the source code is under the GNU LGPL license. 7-Zip works in Windows 98/ME/NT/2000/XP/Vista. There is a port of the command line version to Linux/Unix. Compression ratio results are very dependent upon the data used for the tests. Usually, 7-Zip compresses to 7z format 30-70% better than to zip format. And 7-Zip compresses to zip format 2-10% better than most of other zip compatible programs.
Website | Download
WinRAR
WinRAR is a powerful archive manager. It can backup your data and reduce size of email attachments, decompress RAR, ZIP and other files downloaded from Internet and create new archives in RAR and ZIP file format.
Website | Download
I currently use WinRAR. I've only rarely had to use 7zip for extracting some files that WinRAR couldnt. Anyway, since 7zip extracts more file types and compresses them better, its the clear better recommendation. But since I've been using WinRAR for the past several years now, I wouldn't give it a thumbs-down either. They're both win-win for me. :)
7. VLC


 7-Zip
7-Zip7-Zip is open source software. Most of the source code is under the GNU LGPL license. 7-Zip works in Windows 98/ME/NT/2000/XP/Vista. There is a port of the command line version to Linux/Unix. Compression ratio results are very dependent upon the data used for the tests. Usually, 7-Zip compresses to 7z format 30-70% better than to zip format. And 7-Zip compresses to zip format 2-10% better than most of other zip compatible programs.
Website | Download
WinRAR
WinRAR is a powerful archive manager. It can backup your data and reduce size of email attachments, decompress RAR, ZIP and other files downloaded from Internet and create new archives in RAR and ZIP file format.
Website | Download
I currently use WinRAR. I've only rarely had to use 7zip for extracting some files that WinRAR couldnt. Anyway, since 7zip extracts more file types and compresses them better, its the clear better recommendation. But since I've been using WinRAR for the past several years now, I wouldn't give it a thumbs-down either. They're both win-win for me. :)
7. VLC

VLC media player is a highly portable multimedia player for various audio and video formats (MPEG-1, MPEG-2, MPEG-4, DivX, mp3, ogg, ...) as well as DVDs, VCDs, and various streaming protocols. It can also be used as a server to stream in unicast or multicast in IPv4 or IPv6 on a high-bandwidth network. It doesn't need any external codec or program to work.
To impatient to see the video that hasn't even completed downloading? Well no worries, VLC would play that as well! No Codecs hassles. Watch incomplete-downloaded videos, improper-file-extension-name videos and any shit you wish to with VLC.
8. Total Video Converter
 Total Video Converter is a piece of extremely powerful and full-featured converter software that supports almost all video and audio formats. The software is designed to convert video for your mobile video player as 3gp, mp4, PSP, PS3, iPod, iPhone etc and also VCD or DVD player, XBOX360.
 Total Video Converter is a piece of extremely powerful and full-featured converter software that supports almost all video and audio formats. The software is designed to convert video for your mobile video player as 3gp, mp4, PSP, PS3, iPod, iPhone etc and also VCD or DVD player, XBOX360.
Total Video Converter is hands-down the best video converter I've ever used. I've never had the problem of unrecognized file formats since it offers just so many options! You can also edit the audio bit rate and the video frame rate etc. Add black-bars to the horizontal or vertical edges and convert video files to audio samples. TVC owns. The only downside is that its not freeware. However cracks/serials are freely available on the net, all you've got to do is search. And trust me, it's worth the effort.
9. Daemon

DAEMON Tools is CD & DVD emulation software which allows users to make CD/DVD disc images, create a virtual CD / DVD drives and play CDs & DVDs without the need for the physical disc. It supports more CD / DVD image types than any other CD emulator. It is able to emulate nearly all CD / DVD image types on the market today.
Easy to use and efficient. I've never had to go looking for any other emulation software.
Website | Download
10. Spybot
 Spybot - Search & Destroy detects and removes spyware, a relatively new kind of threat not yet covered by common anti-virus applications. Spybot-S&D can also clean usage tracks, an interesting function if you share your computer with other users and don't want them to see what you have been working on. And for professional users, Spybot-S&D allows you to fix some registry inconsistencies and extended reports.
Simple and excellent Spyware remover. Recommended by millions all over the net, Spybot owns all. Just run this application every once in a while and stay spyware-free.
11. Avast/AVG/Avira


Start here.
Avast:
avast! antivirus Home Edition includes ANTI-SPYWARE protection, certified by the West Coast Labs Checkmark process, and ANTI-ROOTKIT DETECTION based on the best-in class GMER technology. With over 50 million users of avast!, you can rest assured that you are using one of the most tried and trusted products in Windows security.
Website | Download
AVG:
Avira:
Website | Download
10. Spybot
 Spybot - Search & Destroy detects and removes spyware, a relatively new kind of threat not yet covered by common anti-virus applications. Spybot-S&D can also clean usage tracks, an interesting function if you share your computer with other users and don't want them to see what you have been working on. And for professional users, Spybot-S&D allows you to fix some registry inconsistencies and extended reports.
Simple and excellent Spyware remover. Recommended by millions all over the net, Spybot owns all. Just run this application every once in a while and stay spyware-free.
11. Avast/AVG/Avira


Start here.
Avast:
avast! antivirus Home Edition includes ANTI-SPYWARE protection, certified by the West Coast Labs Checkmark process, and ANTI-ROOTKIT DETECTION based on the best-in class GMER technology. With over 50 million users of avast!, you can rest assured that you are using one of the most tried and trusted products in Windows security.
Website | Download
AVG:
AVG Free offers very good (and very free) protection against viruses and spyware... As a bonus, its real-time LinkScanner technology keeps you from clicking search links to dangerous sites. It's an excellent choice if you need free protection against both viruses and spyware.
Avira:
Avira AntiVir Personal - Free Antivirus is a comprehensive, easy to use antivirus program, designed to offer reliable free of charge virus protection to home-users only. Avira offers: Extensive Malware Recognition of viruses, Trojans, backdoor programs, worms, etc. Automatic incremental updates of antivirus signatures, engine and entire software.
Website | Download
Website | Download
There are a lot of good anti-viruses to chose from that are freely avaialable on the internet. But the above 3 make my list for the top 3. I currently use AVG and it's worked fine for me. However, it's important that you regularly update the virus-definitions. Run a scan every once in a while and you'll do good.
That's it for my list. All of the above applications are freewares except for Total Video Converter.
I'd rather you download these softwares and try them out for yourselves instead of deciding to use them or not by only reading their reviews.
Do let me know here if theres any application for Windows which you think is essential to be added to this list.
Saturday, August 9, 2008
Avoid system-formats to save your PC! Please Backup!
I've seen a lot of my friends saying that they had to format they're computers (and thus lose important data) because some virus/trojan had infected their PC. They say they need to re-install the OS altogether to fix the problem and there wasn't any solution.
However, more often than not this isn't true. Windows itself provides several ways to fix the mistakes you made or get your pc back to an earlier normal state.
If you happened to try to edit some important Windows files (intentionally or unintentionally via some program) and screwed your system up causing it to not boot or pop up several message boxes talking about errors, well then a system-format isn't the only solution.
There are simple ways you can fix this without losing out on important data!
You can just use a Windows Component called System Restore to restore your computer to an earlier date, when your system was stable. You can even try reverting your registry to an earlier state if registry-editing has caused you problems. Or there also are other backup programs like Norton Ghost that restore your windows files to a predefined stable state.
I'll explain these backup methods right away.
Backing up Registry.
I've already mentioned in the article before this one how to backup and restore your registry.
This is especially useful when you've edited values in your system registry and it has caused your PC to become unstable.
Check the article out here.
Using System-Restore.
This could well be one of the easiest and quickest ways to get yourself out of a mess you just got into.
What system-restore does is, it restores your computer to an earlier predefined date, just like taking your PC back in time, sometime when your PC was stable.
All you've got to do is regulary set system checkpoints whenever your system is stable so that you can effectively restore to those points in times of trouble!
Using System Restore won't affect newly created or deleted files. It only reverts back to a previous system state wherein it will disregard any newly installed software or application.
Anyway, lets get down to business on how to make a Checkpoint.
Click Start>Programs>Accessories>System tools>System Restore.
Check the "Create a Restore point" radio button and click Next. 
Here, give your restore point a suitable name. If your doing this after a fresh install of your OS, name it something like "Fresh OS install"!
Then click Create!
Your done! Your system restore point is created! :)

 Now to restore your computer to an earlier date, follow the following steps.
Again navigate to Start>Programs>Accessories>System tools>System Restore.
This time choose "Restore my computer to an earlier time"
A calendar will then be displayed featuring all the system restore points that are available to you.
Note that, windows creates system restore points on it's own whenever certain programs are installed and you can choose to restore to these points as well.
Anyway, navigate to the date you created your desired restore point and on the right window you will see a list of restore points that were created on the day.
Choose the appropriate one and then click Next.
 Here you've got to confirm your restore by clicking Next again.
On clicking next, your pc reboots and the system-restore process initiates itself.
However, a system-restore isn't always successful. If the restore is unsuccessful try another restore point.
Remember, the best way to keep your pc and your documents safe is by regulary making restore points. The more the better.
Using Norton Ghost.
Norton Ghost is another wonderful software that quite literally saves your ass when Windows Components/files get corrupted and even System-restore doesn't work.
What it basically does is that it creates a virtual image of your disk and saves it another disk on your computer. So when the disk gets corrupted, all you've got to do is replace the corrupted disc with the content from the virtual image! :)
You can simply create an image of your C: or wherever your OS is installed and then in times of trouble, just replace the entire C: with an earlier, stable state of the drive.
I'll provide links here to some wonderful tutorials/guides made on using Norton Ghost.
Creating Images: http://www.symantec.com/techsupp/tutorial/nghost_10/2005100407425562.htm
Restoring from images: http://ghost.radified.com/ghost_3.htm
Other backup.
Well for frequent bookmarkers like me, it's disastrous when I lose all my Mozilla Firefox bookmarks after a format or unprecedented error.
What I do is, I use MozBackup! :)
It's a simple freeware utility that allows to create and restore backups for your browser.
It's a tiny 1mb file. You can download it from here.
Apart from these backup methods, you should also always backup important files on a drive apart from where your OS is installed i.e. usually C:.
Better yet, if you've got more than one HDD, save a copy on the other one or even on a USB stick if needed.
Remember, formatting isn't always the solution. Even try google if its a specific application-related problem your facing. You could save yourself the trouble of losing out on important data!
Keep backing up! Ciao! :)
Tuesday, July 29, 2008
Backing up your registry.
Some of our readers found the registry edit tweaks a little too dicey and thus avoided them completely. Consequently, I've decided to make a post here, explaining how you can backup your entire windows registry. This helps when you screw things up while editing your windows registry.
All you do then to revert to your original settings is double click the backup file!
So lets get going..
1. Head over to the "Run" menu. Do (the microsoft button)+r or Start>Run.
2. Enter "regedit" in the text field and hit enter to fire up Windows Registry editor.
3. On the left pane, navigate upwards, right to the top and highlight "My computer"
4. Then click "File" and "Export..." in the drop-down menu.
5. Now you've got to save your backup file anywhere on your computer with any name you wish. I recommend you to name it as "Registry Backup 29_07_2008" or something like that so you know what the file is and when the backup was made.
6. Click "Save" once you've selected your desired destination.
A .reg (Registration file) of approximately 50mb is created.
Your now done with making your backup!
After editing your registry while trying tweaks on this site or any other site, in case things do not go as planned, just come back to this file and double click it!
You will be asked if you're sure you want to add the information to your registry. Click Yes your done!
So now you can try out the registry edit-related tweaks here without fear!
Enjoy the site! :)
Friday, June 27, 2008
Easy steps to speed up your net!
Well, to be honest, there is no way that you can directly just boost your net speed apart from purchasing a better net package. But then, there are ways you could boost the rate at which pages load while browsing the internet and make pages load faster for you, thereby "supposedly" making your net faster.
The following tweaks may not make much of a difference to net-users who already have a fast net connection. Anyway, no harm trying these tweaks out.
To start of, Mozilla users can boost the rate at which pages load with a slight tweak in the Mozilla settings. And now with Mozilla 3 available, it's even faster. Anyway, here's the tweak for Broadband users to speed up Mozilla.
1. Start Mozilla, and enter about:config in your address bar.
2. Scroll down and look out for the following settings: 
i. network.http.pipelining
ii. network.http.proxy.pipelining
iii. network.http.pipelining.maxrequests
3. Double click network.http.pipelining to set it to true. By doing this your firefox browser sends multiple requests to a  website.
Similarly, double click network.http.proxy.pipelining to set it to true.
Then, double click network.http.pipelining.maxrequests and reset the integer value to 30. This forces your browser to send  30 requests simultaneously to a website.
Finally, right-click anywhere on the screen and select New->Integer. Enter the name as: nglayout.initialpaint.delay and set it's value to 0.
Your done! Restart your browser and you should notice pages loading considerably faster.
For IE users, you could use the following tweak. What this tweak does is it allows you to load several pages parallel(at the same time) under different tabs or windows.
By default IE sets the limit of parallel conections to a website very low. You can edit this limit, therebyy parallel-loading webpages to a higher level.To do this, we've got to edit Windows registry. You've got to be careful doing this and backup your registry if you can to be on the safe side.
1. Go to Start->Run. Type regedit in the textfield and hit enter. That should start Windows Registry Editor.
2. Navigate to HKEY_CURRENT_USER\SOFTWARE\MICROSOFT\WINDOWS\CURRENTVERSION\INTERNET SETTINGS\

3. Right click on the white-space in the window on the right and select New->DWORD Value.
Enter MaxConnectionsPerServer as the string name. Repeat the process, this time entering MaxConnectionsPer1_0Server as the string name.

4. Now right-click on the MaxConnectionsPerServer and select Modify. Edit the value to Decimal(check Decimal in the Base window) - 6.
Repeat the same for MaxConnectionsPer1_0Server, this time editing the value to Decimal - 8.

Your done!
Now, there's one last thing. Microsoft reserves 20% of your bandwidth for certain sites to access. You could change these(QoS Packet Scheduler) settings to disable this. However, results may vary for different users. I've gone through a lot of reviews on this tweak and the results haven't been all in favour of the tweak. However, do try the tweak out and see if it helps.
There are two ways you could do this.
You could just go to Control Panel->Network & Internet Connections->Network Connections. Browse to the connection you are using, right click on it and select Properties.
There, just disable QoS Packet Scheduler by unchecking the box.
Alternatively, you could follow the following steps.
1. Go to Start->Run. Enter gpedit.msc and hit enter.
2. Navigate to Computer Configurations->Administrative Templates->Network->QoS Packet Scheduler.
3. On the right-side of the window, click on Limit Reservable Bandwidth. Choose Enable and edit the value to 0%. Click Ok.
Your done!
Credits to Rebeck Carvahlo at http://internetpcguide.blogspot.com/ . I first learnt about this tweak from there.
Thats it for now. However there are further tweaks, for high speed connections involving the use of CableNut and other such softwares. I'll try coming up with a guide for that later.
Till then, enjoy this one, Cheers!
Tuesday, June 24, 2008
Convert an AVI file to DVD
I've got lots of stuff in AVI format on my comp...movies, music vids, digicam/handycam vids...blah blah..... And quite often, I want to watch these movies on my TV rather on on the 17" monitor screen. Now, the new DVD players in the market support AVI format file playback. So, you can just make a data CD/DVD with the files you wanna watch. But, the older players just play normal CD's & DVD's. They are incompatible with AVI files. But, no sweat! There's a very simple & FREE way of converting your AVI file into a DVD so that you can enjoy it on your TV.
First of all, we need a video converter that'll convert the AVI file to DVD format. I've searched around the net a lot and I've found a couple of good converters that are also free. I've listed them here-
1.DVD Flick - Download it from HERE
2.Avi2DVD - Download from HERE
3.SUPER (Simplified Universal Player Encoder & Renderer ). Download from HERE
Besides AVI, these softwares can also be used to convert files of other formats.
You may find many other converters (Xilisoft, Cucusoft, ConvertX) if you google for them, but, most of them will be shareware or trial which will convert only a certain percentage of the file or have a time limit or have a watermark on the output file. After a lot of searching, these were the good softwares I've come across.
I've illustrated the actual conversion process using DVD Flick which I find the simplest to use.
1. Download and install DVD Flick from the link I've provided above. Launch the program.
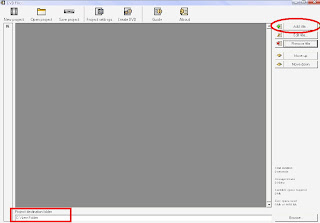 2. The main window looks like the pic alongside. At the bottom left corner, choose the directory where you want the final DVD format output file to be stored. Now, at the top right corner, click on 'Add Title'. Browse for the AVI file on your hard-disk and press OK. I would recommend burning only 1 file on 1 DVD if its a movie file [700MB]. Its not advisable to burn more than 800MB on 1 DVD because when the software converts the file to AVI format, the 700MB file automatically gets bloated up to a 4.2GB file.
3.You can edit the file by selecting it and clicking the 'Edit title' button which is just below the 'Add title' buttuon. Now, the properties window will be displayed. Use the tabs to change any properties you want.
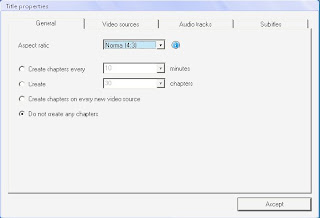
General Tab: Allows you to set aspect ratio [choose 4:3] and create chapters.
Video Tab: Add/remove videos
Audio Tab: Add/remove audio tracks
Subtitles: Add subtitles
Edit anything you want here and there click 'Accept'
4.
 Once, your done editing, click on 'Project Settings' on the toolbar at the top.
 Once, your done editing, click on 'Project Settings' on the toolbar at the top.
 Now, you will be provided with another window-
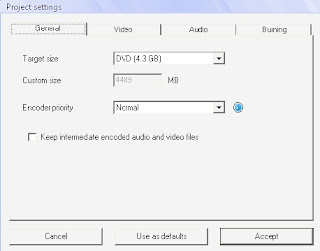
I'll explain the tabs here-
General Tab: Choose the size of the DVD you're gonna burn to. [normally its 4.3GB]. Leave the encoder priority at 'Normal' if you want to use the computer for other work while converting. Else, you can change the priority to 'High'. [This will use lot of RAM]
Video Tab: Here, you just need to decide whether the target format should be PAL or NTSC. In most cases, its NTSC. The best way to see this is if the video runs at 25 frames per second, it is PAL & if it runs near 24 FPS or near 30 FPS it will be NTSC.
Audio Tab: Let the target format remain at 'Auto'
Burning Tab: Here, you can choose whether you want to burn the converted files to a disc or not. If you choose to burn to disc, DVD Flick will automatically author you a DVD. Otherwise, if you select 'Create an ISO' then an ISO format file will be created and stored on your hard-disk which you can later burn using a software of your choice like Nero.
Once your done, click on 'Accept'.
5.Next, in the main window, click on 'Create DVD' which is right next to 'Project Settings'. That's it, your done! Now just let the encoder do its work. Conversion is normally a lengthy process and will take a couple of hours.
General Tab: Choose the size of the DVD you're gonna burn to. [normally its 4.3GB]. Leave the encoder priority at 'Normal' if you want to use the computer for other work while converting. Else, you can change the priority to 'High'. [This will use lot of RAM]
Video Tab: Here, you just need to decide whether the target format should be PAL or NTSC. In most cases, its NTSC. The best way to see this is if the video runs at 25 frames per second, it is PAL & if it runs near 24 FPS or near 30 FPS it will be NTSC.
Audio Tab: Let the target format remain at 'Auto'
Burning Tab: Here, you can choose whether you want to burn the converted files to a disc or not. If you choose to burn to disc, DVD Flick will automatically author you a DVD. Otherwise, if you select 'Create an ISO' then an ISO format file will be created and stored on your hard-disk which you can later burn using a software of your choice like Nero.
Once your done, click on 'Accept'.
5.Next, in the main window, click on 'Create DVD' which is right next to 'Project Settings'. That's it, your done! Now just let the encoder do its work. Conversion is normally a lengthy process and will take a couple of hours.
Once the DVD is burnt, you can watch it on your TV. Enjoy!
Saturday, June 21, 2008
Download videos from YouTube
Any video in the world can be found on youtube! Ok...that might me a bit of an exaggeration..but youtube does have lotsa stuff. Anyway, quite often, I've wanted to get those videos on my computer so that i don't need to connect to the internet evertytime and wait for those videos to buffer in order to watch 'em.
Downloading videos from youtube is a really simple process. You can either use an online website to download the vids or use a software.
Here are some nice sites that allow you to download videos from youtube and other video sites. Some of them will let you download and at the same time convert the file into any other format you want (this is quite useful if you want to put the video on your cell phone or iPod or any other player.
I've illustrated this method with Vixy here-
 1.Browse for the videos at YouTube.com
 2.Copy and Paste the URL of the YouTube video into the form given on any of the above mentioned websites
3.Select which format you want the videos to be converted to.Click "START" to save the YouTube file to your PC. Some sites that don't have a conversion option, may require you to right-click and Slect 'Save target as'. In such cases, don't forget to change the file extension to .flv
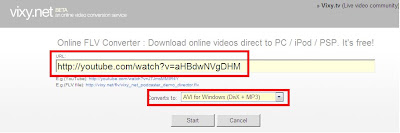
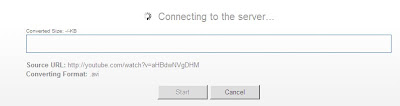
 4.That's it! Now just download the converted video to your desktop.
Another method of getting videos is to use a software like

Simply download this software from HERE. Steps to get the video are quite similar
If your using Mozilla Firefox as your web browser, then getting such videos is even easier. Just get the Video Downloader extension for Firefox from HERE.
When you are on the page click the Video Downloader Button in the bottom right part of your Firefox Browser window. A window will pop up with the download link. Save the video to you disk. [Don't forget to add .flv as file extension!]
When you download YouTube videos without converting them, they are saved in the new.FLV (flash video) format. You will need to download a FLV player to watch these YouTube files on your PC. You can also convert YouTube videos to other formats like .MPEG with a FLV converter.
For free flv player- http://www.martijndevisser.com/blog/article/flv-player-updated
For free flv converter and player- http://www.rivavx.com/index.php?encoder&L=3
If you've got VLC player on your comp, you don't need a separate flv player. VLC plays flv files.
Wednesday, June 18, 2008
Newbie's guide to Torrents
GI've had hundreds of my friends asking me how I download stuff from the net or how these things called torrents work. So here goes:
How to download stuff from the net using torrents!
I won't get into the technicalities about what torrents really are for the benefit of the layman. So... Torrents are just a simple peer-to-peer file sharing protocol. Let me explain;
When you want to download a certain file from the net, say the movie 6thSense.avi, what you do first is search for it's torrent(.torrent) file. This file (which would be around 200-500kb depening the file you wish to download) is basically just an index that lets ur Torrent-Client know, which part of the file you should download from which user on the net. Torrents make you download "parts" of a single file from various users and not necessarily just a single file from an individual user. At the end of the entire download, you have one single file; 6thsense.avi for viewing.
Lets get going.
1. Get a torrent client!
There are several clients available on the net, but I recommend utorrent. It's light and fast.
Download the client(214kb) HERE.
Or head to http://www.utorrent.com/download.php and download uTorrent 1.7.7 Stable.
Run the setup and head on to the next step.
2. Get a torrent!
Now lets just say you want to download the entire album from the movie Jodha Akbar.
You've got to look for a torrent for the album. For that, you head on to any indexing website. These sites are basically just a search engine for all the various .torrent files available on the net.
isoHunt.com ThePirateBay.com mininova.org torrentz.com are a few of them.
I recommend torre ntz.com .
Enter your search keywords in the text field ("Jodha Akbar" in this case)
On hitting "Search torrent" you get a whole list of torrents pertaining to the keywords you entered. Choose the appropriate one depending on the file you want.
Always prefer those torrents which have a large no. of peers(no. in green) since this means this torrent has a larger list of users sharing that file, which means bett er availabilty of the file and hence better download speeds.
Next choose anyone ofthe download locations. It doesn't matter which one. I chose mininova.org .
Here, you get to view the entire contents of the download. You get a detailed list of files that would be downloaded by the torrent. (Incase you wish to download only some of those files and not all, don't go looking for another torrent. You can selectively download only the files that you want to. I'll explain that later.)

Click on one of the download locations and then the download link that appears on your screen.
Save the file to your desktop.
3. Start downloading!
Once the torrent is saved to your desktop simply double click it to start downloading.
A window pops up with a detailed list of the files contained in the torrent. Here you get to choose which files you wish to/not to download. Just uncheck the boxes for the files you wish not to download. (I've unchecked the album-art images since I don't want to download them).
Hit ok, and your done. The download begins right away.
I'll explain what the various columns are:
Name: The name of the file your downloading.
Size: The file size.
Done: Percent of download completed/remaining.
Status: Lets you know if the download is stopped/running/paused.
Seeds: Seeds are the no. of users who are sharing the file on the net.
Downspeed: The speed you are downloading at.
ETA: Estimated time remaining for the file to complete downloading.
On completing the download, browse to your Download directory (whereever you've downloaded the file) which is MyDocuments->Downloads by default. Your file should be available there!
Your done!
Now, there are certain precautions you should know about. Do read on.
Precautions:
1. Torrents aren't completely legal (duhh). So "take care".
2. Since they're illegal, indexing websites often have pornographic material as advertisements.
3. If you've got a limited internet plan, or you've got Dial-up, I recommend you not to use torrents. You are charged not only for download but also upload traffic and torrents involve a lot of uploading too.
There are ways to speed up your download speed which involves port-forwarding etc. but I won't get into that in this guide. This one is for newbies!
Thats it! I haven't been very technical in explaining things I hope.
Please do leave your feedback, it would be most appreciated.
Subscribe to:
Posts (Atom)


 Posts
Posts


