
TeraCopy is a tiny freeware program that is an alternative for the default Windows XP (or Vista) file-copying tool. It copies files at the maximum possible speed, providing the 'current status' of the copying (which includes the estimated time of completion, %left, no. of files completed in batch copying etc..) and it also has an error recoverability feature which is a terribly missed feature in the default copying application.
In case of a file-copy error, it will try several times again to copy the file. And incase a copy still isn't possible it will not terminate the entire copying process (unlike the default copying application in Windows which abruptly stops the copying), but it will just skip the faulty file and copy the rest of the files successfully.
Teracopy also displays the speeds at which files are copied and also offers a unique feature of pausing and resuming a file-copying process.
A portable version of Teracopy is also available incase you're running a slow system.
So, XP and Vista users, stop just copying and start teracopying now!
Showing posts with label freeware. Show all posts
Showing posts with label freeware. Show all posts
Wednesday, April 22, 2009
Start copying using TeraCopy!
Tuesday, June 24, 2008
Convert an AVI file to DVD
I've got lots of stuff in AVI format on my comp...movies, music vids, digicam/handycam vids...blah blah..... And quite often, I want to watch these movies on my TV rather on on the 17" monitor screen. Now, the new DVD players in the market support AVI format file playback. So, you can just make a data CD/DVD with the files you wanna watch. But, the older players just play normal CD's & DVD's. They are incompatible with AVI files. But, no sweat! There's a very simple & FREE way of converting your AVI file into a DVD so that you can enjoy it on your TV.
First of all, we need a video converter that'll convert the AVI file to DVD format. I've searched around the net a lot and I've found a couple of good converters that are also free. I've listed them here-
1.DVD Flick - Download it from HERE
2.Avi2DVD - Download from HERE
3.SUPER (Simplified Universal Player Encoder & Renderer ). Download from HERE
Besides AVI, these softwares can also be used to convert files of other formats.
You may find many other converters (Xilisoft, Cucusoft, ConvertX) if you google for them, but, most of them will be shareware or trial which will convert only a certain percentage of the file or have a time limit or have a watermark on the output file. After a lot of searching, these were the good softwares I've come across.
I've illustrated the actual conversion process using DVD Flick which I find the simplest to use.
1. Download and install DVD Flick from the link I've provided above. Launch the program.
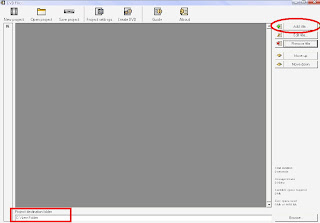 2. The main window looks like the pic alongside. At the bottom left corner, choose the directory where you want the final DVD format output file to be stored. Now, at the top right corner, click on 'Add Title'. Browse for the AVI file on your hard-disk and press OK. I would recommend burning only 1 file on 1 DVD if its a movie file [700MB]. Its not advisable to burn more than 800MB on 1 DVD because when the software converts the file to AVI format, the 700MB file automatically gets bloated up to a 4.2GB file.
3.You can edit the file by selecting it and clicking the 'Edit title' button which is just below the 'Add title' buttuon. Now, the properties window will be displayed. Use the tabs to change any properties you want.
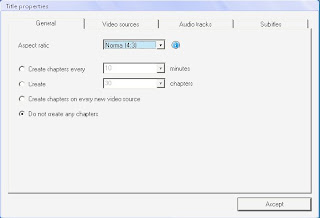
General Tab: Allows you to set aspect ratio [choose 4:3] and create chapters.
Video Tab: Add/remove videos
Audio Tab: Add/remove audio tracks
Subtitles: Add subtitles
Edit anything you want here and there click 'Accept'
4.
 Once, your done editing, click on 'Project Settings' on the toolbar at the top.
 Once, your done editing, click on 'Project Settings' on the toolbar at the top.
 Now, you will be provided with another window-
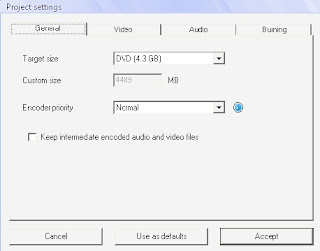
I'll explain the tabs here-
General Tab: Choose the size of the DVD you're gonna burn to. [normally its 4.3GB]. Leave the encoder priority at 'Normal' if you want to use the computer for other work while converting. Else, you can change the priority to 'High'. [This will use lot of RAM]
Video Tab: Here, you just need to decide whether the target format should be PAL or NTSC. In most cases, its NTSC. The best way to see this is if the video runs at 25 frames per second, it is PAL & if it runs near 24 FPS or near 30 FPS it will be NTSC.
Audio Tab: Let the target format remain at 'Auto'
Burning Tab: Here, you can choose whether you want to burn the converted files to a disc or not. If you choose to burn to disc, DVD Flick will automatically author you a DVD. Otherwise, if you select 'Create an ISO' then an ISO format file will be created and stored on your hard-disk which you can later burn using a software of your choice like Nero.
Once your done, click on 'Accept'.
5.Next, in the main window, click on 'Create DVD' which is right next to 'Project Settings'. That's it, your done! Now just let the encoder do its work. Conversion is normally a lengthy process and will take a couple of hours.
General Tab: Choose the size of the DVD you're gonna burn to. [normally its 4.3GB]. Leave the encoder priority at 'Normal' if you want to use the computer for other work while converting. Else, you can change the priority to 'High'. [This will use lot of RAM]
Video Tab: Here, you just need to decide whether the target format should be PAL or NTSC. In most cases, its NTSC. The best way to see this is if the video runs at 25 frames per second, it is PAL & if it runs near 24 FPS or near 30 FPS it will be NTSC.
Audio Tab: Let the target format remain at 'Auto'
Burning Tab: Here, you can choose whether you want to burn the converted files to a disc or not. If you choose to burn to disc, DVD Flick will automatically author you a DVD. Otherwise, if you select 'Create an ISO' then an ISO format file will be created and stored on your hard-disk which you can later burn using a software of your choice like Nero.
Once your done, click on 'Accept'.
5.Next, in the main window, click on 'Create DVD' which is right next to 'Project Settings'. That's it, your done! Now just let the encoder do its work. Conversion is normally a lengthy process and will take a couple of hours.
Once the DVD is burnt, you can watch it on your TV. Enjoy!
Subscribe to:
Posts (Atom)


 Posts
Posts


