Here you'll find several tips, tweaks and tutorials on matters I find interesting (and possibly you will too) regarding the web and other techy stuff. Look around and you'll surely find something that you find useful.

Showing posts with label vista. Show all posts

Thursday, November 26, 2009

Add network activity indicator to Windows 7/Vista


The new network activity icon in the system tray for Windows 7/Vista only shows the list of network connections and doesn't work like how it used to in XP.
The 2 tiny monitors, constantly blinking would let us know when our router had crashed or wasn't responding. Also, it would blink whenever there was any network activity on your machine thereby letting you know of the same.
I badly missed this feature in Windows 7 since ever so often some update program would launch itself in the background and start downloading updates without my notice. Atleast if I had those blinking monitors I'd know about the activity.

Anyway, so if you're missing the network activity indicator as much as I do (or even if you don't) try out this ultra-tiny 57kb app!
Simply download from here. Unzip it to any folder and run the NetworkIndicator.exe file.
You should have the 2 blinky computers on your system tray right away!
To have the app load up at startup each time, simply right click the tray-icon, click Settings, and check the box that says 'Load on startup' and you're golden! :)

via DownloadSquad

Thursday, November 19, 2009

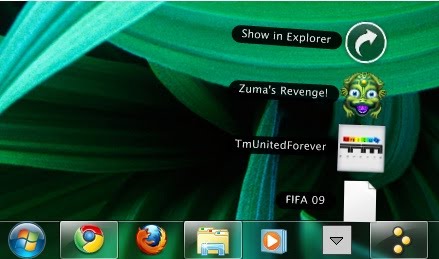
Standalone Stack lets you pin stacks to your Windows Taskbar!

If you use RocketDock you probably also use the Stack-docklet for saving docklet-real-estate. And if you don't use the docklet already, maybe you should! Check it out now!


With the awesome Windows 7 toolbar, you may have already gotten rid of your Dock, however you must be missing the stack-docklet that you had earlier.
Well with 'Standalone Stack' from Chris'n'Soft you can have stacks on your taskbar!


Just download Standalone Stack from here. Unzip the files to C:/standalonestack/ and run the standalonestack2.exe file to fire it up!

Now in the left side bar, select 'New Stack'. On the right, enter a name for your stack and enter a Path name'. Which ever folder you point to here, the contents of that folder would appear in your stack. For example, you could create a folder of all your game shortcuts and then have your stack point to that folder. Consequently you get a stack pointing to all your games on your PC just as I've done in the screenshot above.

Now hit the 'Create Stack' button and then the 'Create shortcut on desktop' button.
You will now get a stack icon on your desktop that does just the same task. If you wish to, you may now pin that shortcut to your taskbar and then delete the shortcut.
And you're done! You've got a stack docklet on your task bar now!

Standalone stack works on XP/Vista/7.

Tuesday, November 17, 2009

Automatic Drive Icons on your Desktop

If you've used ubuntu, you must have noticed that as soon as you enter a flash drive or disc into the machine, you instantly get a helpful little icon on your desktop that points to your newly plugged in drive.


You can have the same functionality on your Windows machines using Desktop Media.
On downloading this tiny app (350kb) just unzip the contents and run the application.
You'll get a tray application and on double clicking it you're presented with a menu with a wide variety of options regarding how you want the app to behave.


You can download Desktop Media from here.

Saturday, October 3, 2009

Search your desktop real-time using Everything

Of late I've been using Everything a lot to search my desktop for files!


It's a really cool software that indexes all your hard disks (as long as they're in NTFS) and lets you search files instantly.

Instantly meaning; hardly you press a key, it will list all files on your system that contain that keyword. And as you key in more characters, all the relevant search results would get filtered.
That is, you get to search real time!

The software is just 334 kb and it beats the default Windows Search hands down!
A must have on your XP system methinks!

Wednesday, April 22, 2009

Start copying using TeraCopy!

TeraCopy is a tiny freeware program that is an alternative for the default Windows XP (or Vista) file-copying tool. It copies files at the maximum possible speed, providing the 'current status' of the copying (which includes the estimated time of completion, %left, no. of files completed in batch copying etc..) and it also has an error recoverability feature which is a terribly missed feature in the default copying application.

In case of a file-copy error, it will try several times again to copy the file. And incase a copy still isn't possible it will not terminate the entire copying process (unlike the default copying application in Windows which abruptly stops the copying), but it will just skip the faulty file and copy the rest of the files successfully.
Teracopy also displays the speeds at which files are copied and also offers a unique feature of pausing and resuming a file-copying process.

A portable version of Teracopy is also available incase you're running a slow system.

So, XP and Vista users, stop just copying and start teracopying now!

Sunday, March 8, 2009

View your Folder Sizes in the Details section of your folders

It's always a pain to not be able to view a folder size directly in the Details-view of a folder. Right-clicking>Properties and then waiting for the folder size to show up isn't the only way out anymore.
You can now use the application Folder Size 2.4 to enable the folder-size attribute to show up in the Details section as seen in the screenshot below.

All you've got to do is download the 228kb .msi file from here. Close any open explorer windows. Run the installer and you're good to go.
Now, just rightclick the Details tab and check the Foldersize attribute to view the folder sizes.
The app also lets you see the number of Folder Children, File Children and All Children.
Enjoy the tweak! :)

Thursday, June 19, 2008

Tweak Windows XP look to like Vista

I was particularly bored of XP. My eyes bled every time I looked at it! Like every other geek in the world, i jumped for joy when Vista was launched, but, quietened down just as soon, coz I heard about all the problems with Vista. I didn't wanna mess up my PC with Vista. Anyway, I decided that I really liked the Vista look. So using some free software, I've managed to give XP the Vista look completely.

Now, there are two ways to do this-
1. Using the shell packs like Vista Transformation Pack. This software automatically converts XP to Vista,but, lots of users have sworn that it'll mess up your computer. So I'm not really in favour of this. Still , if you wanna check it out, head over HERE
2.Using MS-Styles. this option is relatively safer and it'll not damage you comp at all. It basically consists of some small softwares that will give you the Vista look altogether. I have explained this method below.

Here's a screenshot of my desktop- the standard XP look -


OK, lets start!

To make XP look like Vista, you basically need to change the following stuff on the comp-
- The basic theme (which includes the vista windows, fonts, start button, etc.)
- Icons (like My Computer and My Documents)
- Transparency
- Sidebar
- Wallpapers, Screensavers, Vista sounds, Mouse pointer, etc.

1. In order to apply any new style to XP, you first need to patch up uxtheme.dll
Download it from HERE. 'uxtheme.dll' is a patch for the latest Windows XP Service Pack 2 to enable third party theme usage.

Then download and install another software called Skinny from HERE
Use skinny to patch the uxtheme.dll (the first download). It's easy, you just open Skinny, locate the file, and follow the steps on the screen.

2.Then, download the theme from HERE or HERE. It includes the basic Vista theme.

Open the theme [i.e. the Windows Visual Style file which has extension *.msstyles] and windows should now recognize it. Just double click and apply it.
Or copy it to C:\WINDOWS\Resources\Themes and then right click on your desktop and select 'Properties'. Go to the 'Themes' tab and select the theme from the drop down list and apply it.

3. For icons, first download and install Icon Tweaker from HERE
Then get the Vista icon pack from HERE
Now open Icon Tweaker and use the 'Install Theme' option to search and install the Vista Icon Pack. Then simply apply the theme.This could take a little while, but it's worth it.


4.To get the transparency effect of Windows Vista, download and install Glass2K from HERE.
Glass2k is a small little program that makes any window transparent. Right-click on any window or press the keyboard shortcuts (Control + Shift + [0-9]) to make any window transparent. It's that simple.
Above, there's a shot of how you can literally "see through" the windows using Glass2K.


5.Now for the Vista sidebar. Download and install Thoosje's Vista Sidebar from HERE.
It has gadgets like media players, google search, yahoo search , weather and system uptime and lots of more useful gadgets. Here's a screenshot of the sidebar-


6.Next, we gotta get the Vista wallpaper. I've uploaded some nice wallpapers HERE.
Alternatively, you would find lots of neat walls if you google for Vista wallpapers.

Get Vista Screensavers from HERE. Just download the above file and unzip the scr screensaver files in your Windows installation directory [defaults to C:\Windows\SYSTEM32] . The instructions to customize the various settings of these screensavers are mentioned in the text files attached with each Vista screensaver.

For the Vista cursors, download the Aero cursor pack HERE. Just read the read me file supplied and enjoy.

7.To switch between windows [Vista style], get the Windows Alt-Tab Replacement PowerToy from HERE. With this, in addition to seeing the icon of the application window you are switching to, you will also see a preview of the page.

And your done! Now you can start celebrating! You could actually fool anyone into thinking that you've got Vista on your comp now.

Here are some screenshots of my desktop after I finished tweaking it -


This ought to keep you busy for awhile!

Please leave your comments.


Related Posts with Thumbnails