Here you'll find several tips, tweaks and tutorials on matters I find interesting (and possibly you will too) regarding the web and other techy stuff. Look around and you'll surely find something that you find useful.

Friday, June 27, 2008

Easy steps to speed up your net!

Well, to be honest, there is no way that you can directly just boost your net speed apart from purchasing a better net package. But then, there are ways you could boost the rate at which pages load while browsing the internet and make pages load faster for you, thereby "supposedly" making your net faster.


The following tweaks may not make much of a difference to net-users who already have a fast net connection. Anyway, no harm trying these tweaks out.

To start of, Mozilla users can boost the rate at which pages load with a slight tweak in the Mozilla settings. And now with Mozilla 3 available, it's even faster. Anyway, here's the tweak for Broadband users to speed up Mozilla.
1. Start Mozilla, and enter about:config in your address bar.
2. Scroll down and look out for the following settings:
i. network.http.pipelining
ii. network.http.proxy.pipelining
iii. network.http.pipelining.maxrequests
3. Double click network.http.pipelining to set it to true. By doing this your firefox browser sends multiple requests to a website.
Similarly, double click network.http.proxy.pipelining to set it to true.
Then, double click network.http.pipelining.maxrequests and reset the integer value to 30. This forces your browser to send 30 requests simultaneously to a website.
Finally, right-click anywhere on the screen and select New->Integer. Enter the name as: nglayout.initialpaint.delay and set it's value to 0.


Your done! Restart your browser and you should notice pages loading considerably faster.


For IE users, you could use the following tweak. What this tweak does is it allows you to load several pages parallel(at the same time) under different tabs or windows.

By default IE sets the limit of parallel conections to a website very low. You can edit this limit, therebyy parallel-loading webpages to a higher level.

To do this, we've got to edit Windows registry. You've got to be careful doing this and backup your registry if you can to be on the safe side.
1. Go to Start->Run. Type regedit in the textfield and hit enter. That should start Windows Registry Editor.
2. Navigate to HKEY_CURRENT_USER\SOFTWARE\MICROSOFT\WINDOWS\CURRENTVERSION\INTERNET SETTINGS\
3. Right click on the white-space in the window on the right and select New->DWORD Value.
Enter MaxConnectionsPerServer as the string name. Repeat the process, this time entering MaxConnectionsPer1_0Server as the string name.
4. Now right-click on the MaxConnectionsPerServer and select Modify. Edit the value to Decimal(check Decimal in the Base window) - 6.
Repeat the same for MaxConnectionsPer1_0Server, this time editing the value to Decimal - 8.
Your done!


Now, there's one last thing. Microsoft reserves 20% of your bandwidth for certain sites to access. You could change these(QoS Packet Scheduler) settings to disable this. However, results may vary for different users. I've gone through a lot of reviews on this tweak and the results haven't been all in favour of the tweak. However, do try the tweak out and see if it helps.
There are two ways you could do this.
You could just go to Control Panel->Network & Internet Connections->Network Connections. Browse to the connection you are using, right click on it and select Properties.
There, just disable QoS Packet Scheduler by unchecking the box.

Alternatively, you could follow the following steps.
1. Go to Start->Run. Enter gpedit.msc and hit enter.
2. Navigate to Computer Configurations->Administrative Templates->Network->QoS Packet Scheduler.
3. On the right-side of the window, click on Limit Reservable Bandwidth. Choose Enable and edit the value to 0%. Click Ok.
Your done!

Credits to Rebeck Carvahlo at http://internetpcguide.blogspot.com/ . I first learnt about this tweak from there.

Thats it for now. However there are further tweaks, for high speed connections involving the use of CableNut and other such softwares. I'll try coming up with a guide for that later.
Till then, enjoy this one, Cheers!

Tuesday, June 24, 2008

Convert an AVI file to DVD

I've got lots of stuff in AVI format on my comp...movies, music vids, digicam/handycam vids...blah blah..... And quite often, I want to watch these movies on my TV rather on on the 17" monitor screen. Now, the new DVD players in the market support AVI format file playback. So, you can just make a data CD/DVD with the files you wanna watch. But, the older players just play normal CD's & DVD's. They are incompatible with AVI files. But, no sweat! There's a very simple & FREE way of converting your AVI file into a DVD so that you can enjoy it on your TV.


First of all, we need a video converter that'll convert the AVI file to DVD format. I've searched around the net a lot and I've found a couple of good converters that are also free. I've listed them here-
1.DVD Flick - Download it from HERE

2.Avi2DVD - Download from HERE

3.SUPER (Simplified Universal Player Encoder & Renderer ). Download from HERE

Besides AVI, these softwares can also be used to convert files of other formats.

You may find many other converters (Xilisoft, Cucusoft, ConvertX) if you google for them, but, most of them will be shareware or trial which will convert only a certain percentage of the file or have a time limit or have a watermark on the output file. After a lot of searching, these were the good softwares I've come across.

I've illustrated the actual conversion process using DVD Flick which I find the simplest to use.

1. Download and install DVD Flick from the link I've provided above. Launch the program.


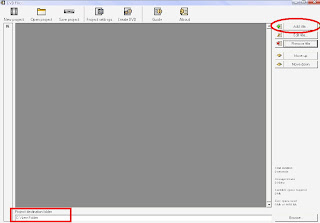
2. The main window looks like the pic alongside. At the bottom left corner, choose the directory where you want the final DVD format output file to be stored. Now, at the top right corner, click on 'Add Title'. Browse for the AVI file on your hard-disk and press OK. I would recommend burning only 1 file on 1 DVD if its a movie file [700MB]. Its not advisable to burn more than 800MB on 1 DVD because when the software converts the file to AVI format, the 700MB file automatically gets bloated up to a 4.2GB file.
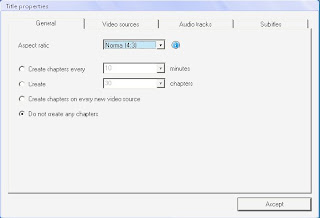
3.You can edit the file by selecting it and clicking the 'Edit title' button which is just below the 'Add title' buttuon. Now, the properties window will be displayed. Use the tabs to change any properties you want.


General Tab: Allows you to set aspect ratio [choose 4:3] and create chapters.
Video Tab: Add/remove videos
Audio Tab: Add/remove audio tracks
Subtitles: Add subtitles
Edit anything you want here and there click 'Accept'


4.
Once, your done editing, click on 'Project Settings' on the toolbar at the top.


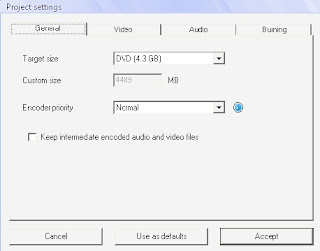
Now, you will be provided with another window-


I'll explain the tabs here-
General Tab: Choose the size of the DVD you're gonna burn to. [normally its 4.3GB]. Leave the encoder priority at 'Normal' if you want to use the computer for other work while converting. Else, you can change the priority to 'High'. [This will use lot of RAM]
Video Tab: Here, you just need to decide whether the target format should be PAL or NTSC. In most cases, its NTSC. The best way to see this is if the video runs at 25 frames per second, it is PAL & if it runs near 24 FPS or near 30 FPS it will be NTSC.
Audio Tab: Let the target format remain at 'Auto'
Burning Tab: Here, you can choose whether you want to burn the converted files to a disc or not. If you choose to burn to disc, DVD Flick will automatically author you a DVD. Otherwise, if you select 'Create an ISO' then an ISO format file will be created and stored on your hard-disk which you can later burn using a software of your choice like Nero.
Once your done, click on 'Accept'.

5.Next, in the main window, click on 'Create DVD' which is right next to 'Project Settings'. That's it, your done! Now just let the encoder do its work. Conversion is normally a lengthy process and will take a couple of hours.


Once the DVD is burnt, you can watch it on your TV. Enjoy!

Sunday, June 22, 2008

New Sony Ericsson Mobiles

8 MP Sony Ericsson Cell phone!

Yeah!...You read right! Just as I thought that a 5MP on a camera phone was gonna be the standard for a while, Sony Ericsson has gone ahead and announced the 8MP

Sony
Ericsson C905
code-named Shiho.

This phone which had been kept under wraps for long has finally been officially announced by Sony on 17th June.

This 3G and EDGE enabled little wonder, sports a cool 8.1MP camera which boasts of auto focus , image stabilization, xenon and a photo flash , BestPic, red-eye reduction, face detection and a new feature called Smart COntrast. The cam is capable of producing a maximum image resolution of 3264 x 2448 pixels.The shocking resolution will give you brilliant A3 size prints as well! The cell also has some cool pre-installed applications like Cam Plus which adds some shooting modes to the camera.

The C905 is honoured with the presence of built-in WiFi with DLNA-support, so all media in your home can be shared. It's also got a GPS with geo-tagging, TV-out, stereo bluetooth, the Netfront 4.5 web browser...so its a complete wireless networking device.

It also has an acceleromater. This means that the the pictures will change to landscape mode when you tilt the phone. [similar to the way the iPhone does]

The battery is good for 380 hours of standby or 9 hours of talk on GSM networks.

Besides that, all standard features like a nice audio & video player, FM, card slot, etc. are obviously included.

The only thing I was not so keen on was the size and the look. At 136g and dimensions of 104 x 49 x 18, its quite bulky. Its as big as the Nokia N81. But, if your used to carting around a bulky handset....the size wouldn't be too much of an issue, I think.

There's no info as yet about the possible price of this phone. It'll be available in the 4th quarter of 2008 in different colours like Copper Gold, Ice Silver & Night Black .

Here's a demo of the phone to get you more excited:


Sony Ericsson Gaming Phone

The
Sony Ericsson F305
is a normal mid-range quad-band GSM/EDGE device. But wait! Its not that boring. It offers an interesting gaming feature to the market.

The display is a 2-inch TFT with a standard 176X220 resolution. It has a 2MP camera [lacks autofoucus], FM, stereo bluetooth, music & video player.

Now, the interesting part! The speciality of this phone is that it is has an accelerometer which is a built-in sensor that is utilised while gaming. [This made me think of the Wii actually] . The F305 comes with three pre-installed games on the device (Bowling, Bass fishing and Jockey. So, if you feel like playing some bowling for example you can do that by simply swinging the handset as if you are to throw a bowling ball. Or if you feel like fishing, you can just swing the phone like a fishing line! Just don't end up throwing the handset in the bargain!

Additional motion games developed by Gameloft can be downloaded at PlayNow.
Some of the games can be played in multiplayer mode via bluetooth. This phone also has some special keys on its console which are to be used for gaming.

All in all, its a nice handset...especially for those looking for a new gaming experience. Also, its not expensive and that increses its attractiveness. And yeah....you can pimp the look of this cell using Style-Up covers. Two covers are included in the retail box itself!

The Sony Ericsson F305 in the 3rd quarter of this year in Polar White and Mystic Black colours. No details about tentative price as yet.
You can check out the official F305 promo here-


These handsets already have me drooling! I think we'll see even more innovative cellphones in the future.

Saturday, June 21, 2008

Download videos from YouTube

Any video in the world can be found on youtube! Ok...that might me a bit of an exaggeration..but youtube does have lotsa stuff. Anyway, quite often, I've wanted to get those videos on my computer so that i don't need to connect to the internet evertytime and wait for those videos to buffer in order to watch 'em.

Downloading videos from youtube is a really simple process. You can either use an online website to download the vids or use a software.

Here are some nice sites that allow you to download videos from youtube and other video sites. Some of them will let you download and at the same time convert the file into any other format you want (this is quite useful if you want to put the video on your cell phone or iPod or any other player.


I've illustrated this method with Vixy here-

1.Browse for the videos at YouTube.com


2.Copy and Paste the URL of the YouTube video into the form given on any of the above mentioned websites

3.Select which format you want the videos to be converted to.Click "START" to save the YouTube file to your PC. Some sites that don't have a conversion option, may require you to right-click and Slect 'Save target as'. In such cases, don't forget to change the file extension to .flv


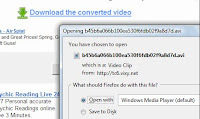
4.That's it! Now just download the converted video to your desktop.


Another method of getting videos is to use a software like
Simply download this software from HERE. Steps to get the video are quite similar


If your using Mozilla Firefox as your web browser, then getting such videos is even easier. Just get the Video Downloader extension for Firefox from HERE.

When you are on the page click the Video Downloader Button in the bottom right part of your Firefox Browser window. A window will pop up with the download link. Save the video to you disk. [Don't forget to add .flv as file extension!]


When you download YouTube videos without converting them, they are saved in the new.FLV (flash video) format. You will need to download a FLV player to watch these YouTube files on your PC. You can also convert YouTube videos to other formats like .MPEG with a FLV converter.


For free flv player- http://www.martijndevisser.com/blog/article/flv-player-updated


For free flv converter and player- http://www.rivavx.com/index.php?encoder&L=3


If you've got VLC player on your comp, you don't need a separate flv player. VLC plays flv files.

Thursday, June 19, 2008

Tweak Windows XP look to like Vista

I was particularly bored of XP. My eyes bled every time I looked at it! Like every other geek in the world, i jumped for joy when Vista was launched, but, quietened down just as soon, coz I heard about all the problems with Vista. I didn't wanna mess up my PC with Vista. Anyway, I decided that I really liked the Vista look. So using some free software, I've managed to give XP the Vista look completely.

Now, there are two ways to do this-
1. Using the shell packs like Vista Transformation Pack. This software automatically converts XP to Vista,but, lots of users have sworn that it'll mess up your computer. So I'm not really in favour of this. Still , if you wanna check it out, head over HERE
2.Using MS-Styles. this option is relatively safer and it'll not damage you comp at all. It basically consists of some small softwares that will give you the Vista look altogether. I have explained this method below.

Here's a screenshot of my desktop- the standard XP look -


OK, lets start!

To make XP look like Vista, you basically need to change the following stuff on the comp-
- The basic theme (which includes the vista windows, fonts, start button, etc.)
- Icons (like My Computer and My Documents)
- Transparency
- Sidebar
- Wallpapers, Screensavers, Vista sounds, Mouse pointer, etc.

1. In order to apply any new style to XP, you first need to patch up uxtheme.dll
Download it from HERE. 'uxtheme.dll' is a patch for the latest Windows XP Service Pack 2 to enable third party theme usage.

Then download and install another software called Skinny from HERE
Use skinny to patch the uxtheme.dll (the first download). It's easy, you just open Skinny, locate the file, and follow the steps on the screen.

2.Then, download the theme from HERE or HERE. It includes the basic Vista theme.

Open the theme [i.e. the Windows Visual Style file which has extension *.msstyles] and windows should now recognize it. Just double click and apply it.
Or copy it to C:\WINDOWS\Resources\Themes and then right click on your desktop and select 'Properties'. Go to the 'Themes' tab and select the theme from the drop down list and apply it.

3. For icons, first download and install Icon Tweaker from HERE
Then get the Vista icon pack from HERE
Now open Icon Tweaker and use the 'Install Theme' option to search and install the Vista Icon Pack. Then simply apply the theme.This could take a little while, but it's worth it.


4.To get the transparency effect of Windows Vista, download and install Glass2K from HERE.
Glass2k is a small little program that makes any window transparent. Right-click on any window or press the keyboard shortcuts (Control + Shift + [0-9]) to make any window transparent. It's that simple.
Above, there's a shot of how you can literally "see through" the windows using Glass2K.


5.Now for the Vista sidebar. Download and install Thoosje's Vista Sidebar from HERE.
It has gadgets like media players, google search, yahoo search , weather and system uptime and lots of more useful gadgets. Here's a screenshot of the sidebar-


6.Next, we gotta get the Vista wallpaper. I've uploaded some nice wallpapers HERE.
Alternatively, you would find lots of neat walls if you google for Vista wallpapers.

Get Vista Screensavers from HERE. Just download the above file and unzip the scr screensaver files in your Windows installation directory [defaults to C:\Windows\SYSTEM32] . The instructions to customize the various settings of these screensavers are mentioned in the text files attached with each Vista screensaver.

For the Vista cursors, download the Aero cursor pack HERE. Just read the read me file supplied and enjoy.

7.To switch between windows [Vista style], get the Windows Alt-Tab Replacement PowerToy from HERE. With this, in addition to seeing the icon of the application window you are switching to, you will also see a preview of the page.

And your done! Now you can start celebrating! You could actually fool anyone into thinking that you've got Vista on your comp now.

Here are some screenshots of my desktop after I finished tweaking it -


This ought to keep you busy for awhile!

Please leave your comments.


Wednesday, June 18, 2008

Newbie's guide to Torrents

GI've had hundreds of my friends asking me how I download stuff from the net or how these things called torrents work. So here goes:

How to download stuff from the net using torrents!

I won't get into the technicalities about what torrents really are for the benefit of the layman. So... Torrents are just a simple peer-to-peer file sharing protocol. Let me explain;

When you want to download a certain file from the net, say the movie 6thSense.avi, what you do first is search for it's torrent(.torrent) file. This file (which would be around 200-500kb depening the file you wish to download) is basically just an index that lets ur Torrent-Client know, which part of the file you should download from which user on the net. Torrents make you download "parts" of a single file from various users and not necessarily just a single file from an individual user. At the end of the entire download, you have one single file; 6thsense.avi for viewing.


Lets get going.

1. Get a torrent client!

There are several clients available on the net, but I recommend utorrent. It's light and fast.
Download the client(214kb) HERE.
Or head to http://www.utorrent.com/download.php and download uTorrent 1.7.7 Stable.
Run the setup and head on to the next step.


2. Get a torrent!
Now lets just say you want to download the entire album from the movie Jodha Akbar.
You've got to look for a torrent for the album. For that, you head on to any indexing website. These sites are basically just a search engine for all the various .torrent files available on the net.
isoHunt.com ThePirateBay.com mininova.org torrentz.com are a few of them.
I recommend torrentz.com .
Enter your search keywords in the text field ("Jodha Akbar" in this case)
On hitting "Search torrent" you get a whole list of torrents pertaining to the keywords you entered. Choose the appropriate one depending on the file you want.

Always prefer those torrents which have a large no. of peers(no. in green) since this means this torrent has a larger list of users sharing that file, which means better availabilty of the file and hence better download speeds.

Next choose anyone ofthe download locations. It doesn't matter which one. I chose mininova.org .

Here, you get to view the entire contents of the download. You get a detailed list of files that would be downloaded by the torrent. (Incase you wish to download only some of those files and not all, don't go looking for another torrent. You can selectively download only the files that you want to. I'll explain that later.)

Click on one of the download locations and then the download link that appears on your screen.

Save the file to your desktop.


3. Start downloading!

Once the torrent is saved to your desktop simply double click it to start downloading.
A window pops up with a detailed list of the files contained in the torrent. Here you get to choose which files you wish to/not to download. Just uncheck the boxes for the files you wish not to download. (I've unchecked the album-art images since I don't want to download them).
Hit ok, and your done. The download begins right away.


I'll explain what the various columns are:
Name: The name of the file your downloading.
Size: The file size.
Done: Percent of download completed/remaining.
Status: Lets you know if the download is stopped/running/paused.
Seeds: Seeds are the no. of users who are sharing the file on the net.
Downspeed: The speed you are downloading at.
ETA: Estimated time remaining for the file to complete downloading.

On completing the download, browse to your Download directory (whereever you've downloaded the file) which is MyDocuments->Downloads by default. Your file should be available there!

Your done!

Now, there are certain precautions you should know about. Do read on.
Precautions:
1. Torrents aren't completely legal (duhh). So "take care".
2. Since they're illegal, indexing websites often have pornographic material as advertisements.
3. If you've got a limited internet plan, or you've got Dial-up, I recommend you not to use torrents. You are charged not only for download but also upload traffic and torrents involve a lot of uploading too.

There are ways to speed up your download speed which involves port-forwarding etc. but I won't get into that in this guide. This one is for newbies!

Thats it! I haven't been very technical in explaining things I hope.
Please do leave your feedback, it would be most appreciated.

Related Posts with Thumbnails