
Some of our readers found the registry edit tweaks a little too dicey and thus avoided them completely. Consequently, I've decided to make a post here, explaining how you can backup your entire windows registry. This helps when you screw things up while editing your windows registry.
All you do then to revert to your original settings is double click the backup file!
So lets get going..
1. Head over to the "Run" menu. Do (the microsoft button)+r or Start>Run.
2. Enter "regedit" in the text field and hit enter to fire up Windows Registry editor.
3. On the left pane, navigate upwards, right to the top and highlight "My computer"
4. Then click "File" and "Export..." in the drop-down menu.
5. Now you've got to save your backup file anywhere on your computer with any name you wish. I recommend you to name it as "Registry Backup 29_07_2008" or something like that so you know what the file is and when the backup was made.
6. Click "Save" once you've selected your desired destination.
A .reg (Registration file) of approximately 50mb is created.
Your now done with making your backup!
After editing your registry while trying tweaks on this site or any other site, in case things do not go as planned, just come back to this file and double click it!
You will be asked if you're sure you want to add the information to your registry. Click Yes your done!
So now you can try out the registry edit-related tweaks here without fear!
Enjoy the site! :)
Tuesday, July 29, 2008
Backing up your registry.
Sunday, July 20, 2008
Edit "Start" in the start button to any other text!
Yeah, using this tweak you can edit the "Start" in the Start menu to anything you like; your name, your dog's name, anything at all! ;)
Credits to Jim Foley a.k.a. TheElderGeek at http://www.theeldergeek.com/ for this kickass tweak.
I tweaked mine to look like my gaming nick, "xatax"! 

Before beginning, I'd like to make it very clear that this tweak involves editing your Windows Registry and WINDOWS core files (explorer.exe). There is always a risk of causing harm to your system. I've tried this tweak and it has worked fine for me. However, it may or may not work with you. If you mess up, I will not assume any responsibilty. I'd try my best to help you out of the mess though. :)
This tweak works for Windows XP Home and Professional versions. If you are using any other OS, avoid this tweak.
You can safely try this tweak by first backing up your registry. To learn how to backup your registry, click here.
 Now go to File>Open and navigate to C:\Windows\explorer.exe (Be sure not to make a mix up with explorer.scf).

Lets begin.
First you need to install Resource Hacker. Resource HackerTM is a freeware utility to view, modify, rename, add, delete and extract resources in 32bit Windows executables and resource files (*.res). It incorporates an internal resource script compiler and decompiler and works on Win95, Win98, WinME, WinNT, Win2000 and WinXP operating systems. Click here to directly download it to your pc.
Unzip and run ResHacker.
Now go to File>Open and navigate to C:\Windows\explorer.exe (Be sure not to make a mix up with explorer.scf).On the left pane, navigate to String Table>37>1033. Here, as you may have already guessed, we edit line 578.
Simply replace "start" with text of your choice without removing the quotation marks. "xatax" in my case.
Now click Compile Script! Next, from the File menu, DO NOT "Save". Use "Save as" and save it as explorer.exe in any folder within C:\Windows (that does not already contain an explorer.exe file) but NOT C:Windows itself. I used C:Windows\inf. You could do the same.
Now all we've got to do is edit the registry so that windows accesses the edited explorer.exe file whenever the user logs on.
Fire up Registry Editor. (Start>Run. Enter regedit in the text field.)
Navigate to HKEY_LOCAL_MACHINE\ SOFTWARE\ Microsoft\ Windows NT\ CurrentVersion\ Winlogon
In the right pane, navigate to the "Shell" entry. Double click it to edit the string. In the Value data line, enter the directory and file name that was used to save explorer.exe . In my case, inf/explorer.exe .
Hit ok. F5 to refresh. Close the Registry Editor. Log off and log back on or simply reboot and you should see the new edited Start button! :)
Friday, July 11, 2008
How to hide files inside an image
This is an old but neat trick to hide files on your comp. it works because most people wouldn't really think of hiding stuff inside a JPEG file. They would either change the File Properties to 'Hidden' [but this can easily be revealed by changing the Folder Properties] or they would use software to hide files [which is not a free option]
Now, to hide files "inside" an image all you need is a software like WinRAR. Winzip & 7-Zip also work but not as well. Get WinRAR from HERE.
1.Make a new folder and move all the files you want to hide to this folder. In our case, the folder is C:\Tech-gyaan. The files I intend to hide are "File1.doc" & "File2.txt".
Also move the JPEG image file that you intend to use to this folder.
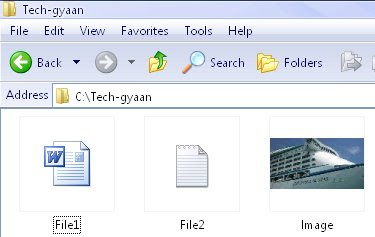
2. Now select all the files you want to hide, right click, and select 'Add to Archive'.
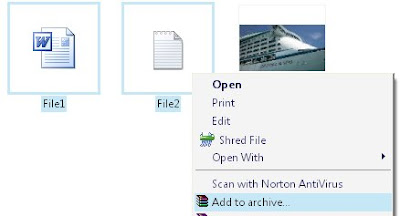

In the window that pops up, name the archive anything you want. I've named it TG.rar
3. Next, go to Start-> Run. Type in 'cmd' to open the command prompt. Type in cd.. until you come to the root C: drive. Next, type cd Tech-gyaan or whatever is the name of the folder you've created.
Now type in "copy /b Image.JPG + TG.rar Image.jpg" without quotes & press Enter. [Replace 'TG' & Image with the appropriate name of the respective files on your comp]
You should see a response like the one below saying '1 file(s) copied.'
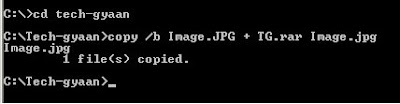
That's it! You've successfully hidden those files inside the image. Anyone else will just think that its a normal image. Nothing more!
You'll notice that the size of the JPEG image increases a bit. Now to access those hidden files when you need them, you can right click on the image file, go to 'Open With' and select WinRAR from the list of programs. If WinRAR is not displayed in the list, simply click on 'Choose program' and then scroll down toWinRAR. You should now be able to see your hidden files in WinRAR. You can extract them if you want to.
You could even encrypt or password protect the rar file for better security.
Sunday, July 6, 2008
iPhone Killers - Cells That beat the iPhone!
The iPhone!! ....yeah....the most hyped device of our time!! With Vodafone & Airtel starting pre-registration of the iPhone, the craze is soon gonna engulf the Indian market. Till now, the iPhone was a novelty available only if you could shell out big bucks in the grey market. With the official launch, the price is rumoured to be about $199 that translates into just Rs.8000. I'm pretty skeptical about the price being so low, but, I'll save that incredulity for an article when the iPhone actually launches in India.
Anyway, most people who've got their eyeballs firmly affixed on the iPhone are unaware of the other options available in the market. In some cases, these alternatives have better features than the iPhone also!
HTC
HTC Touch Diamond
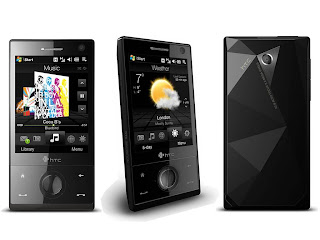 This is one handset I'm absolutely in love with! The stunning aesthetics are only enhanced by the enviable Touch screen interface. The Touch Diamond incorporates an intuitive TouchFLO 3D technology that is really cool! Its got an awesome 2.8-inch screen with Touch-sensitive navigation control.
An impressive 3.2MP camera with autofocus takes nice shots in comparison to the 2MP on the iPhone. A secondary camera is also included which the iPhone lacks. The Touch Diamond is great on connectivity with a built in A-GPS that you can use with your choice of satnav software and 3.5G data high download & upload speeds with HSDPA. There’s also built in WiFi [which the iPhone lacks again], Bluetooth 2.0. Wi-fi is not included in the 3G iPhone.
The Touch Diamond operates on Windows Mobile 6 also comes with 4GB internal storage & extendable memory.
Here's a video of the touch-flo technology that's second only to the iPhone!
A non-3G version of the Touch Diamond has already been launched officially in India for Rs.27,500. Its cheaper in the grey market. But expect a major price drop once the iPhone releases.
A non-3G version of the Touch Diamond has already been launched officially in India for Rs.27,500. Its cheaper in the grey market. But expect a major price drop once the iPhone releases.
HTC Touch Pro
The HTC Touch Pro is similar to the Touch Diamond in all specs. The only part where it differs is that it include an entire keyboard with it. So for QWERTY aficionados, its a perfect choice!
Sony Ericsson
Sony Ericsson Xperia X1
 The much expected Sony Ericsson XPERIA X1 QWERTY has finally been launched. s the first SOny phone to work on Windows Mobile6 complete with Outlook Mobile & Office Mobilemaking this a good business phone. The 3 inch touch screen has a neat 800 x 480 resolution with 9 customizable layouts .It is accompanied by a full QWERTY keyboard and also has handwriting recognition..
  You can't go wrong with the 3.2Mp camera with photo light.
Again, even this cell sports bluetooth, Wif-fi, HSDPA & a-GPS with location tagging.
It has 400MB onboard memory with a micr-SD slot. This a new development for Sony which has refused to budge from its trusted memory stick since ages!
Nokia
Nokia Tube
 A touch user interface on a Nokia is something I've yearned for a long long time! It couldn't have been long since Nokia has also jumped into the Touch screen phones bandwagon. The only other Nokia touch screen devices like the 6708 & N810i havn't created too much furore atleast in the Indian market. This highly hyped touch screen will be Nokia's attempt to take on the iPhone. Its the first Nokia touch screen to run on the Series 60 Symbian interface & is touted to be the flagship for a new line-up. The Tube also called the Nokia 5800 XpressMedia is expected to hav
 e a 16M TFT display with 360 x 640 pixels resolution and 16:9 aspect ratio.
Nokia has kept this device under wraps & isn't letting on too much info , but, have stated that the device is gonna have a nice big screen with camera better than that of the iPhone. Of course, connectivity features include the usual Bluetooth, 3G, Wi-fi,a-GPS that I've come to expect from high-end Nokia's.Nokia Tube runs on the latest Nokia 5th generation S60 full Touch.
Samsung
Instinct
 The Instinct is response to the iPhone. Its been added to the alreaady existing Samsung Line up comprising the Voyager & Glyde It has 3.1-inch touchscreen with localized haptic feedback, plus three hard navigation keys. The home-screen is highly customizable so that you can access your fav applications with a single touch. The interface is simple and easily adaptable.The 2MP camera is decent enough but doesn't match up to the likes of HTC, Sony & Nokia. It also offers Visual Voicemail & audible caller ID

Another entry is the F700 which has a 3.2MP cam is equipped with a slide-out QWERTY keyboard. It has a 2.78-inch color TFT screen with 440×240 pixels resolution. Specs similar to other devices though this one lacks Wifi .In addition it also sports VibeTonz technology which allows users to feel the buttons accompanied by responsive vibrations. The touch interface is the proprietary OS with a unique drag and drop system for easiermenu navigation and media playback.
Samsung i900 Omnia

Okay, the newly announced i900 makes even the Instinct seem kinda extinct! The litte brother of the F700 in size, it sports n ambitious 5 MP camera, bringing it up to par with the current high-end offerings from Nokia and Sony Ericsson. The cam has auto focus snapper with auto-panorama shot plus face and smile detection that automatically clicks the photo when the subject smiles!
This little baby has a 240X400 screen with 8 gigs of internal storage! A 16GB version will also be available in the market. It runs on Samsung had also imported their TouchWiz technology on this Windows Mobile phone .
LG
LG-KE850
 LG-KE850 also known as the LG Prada Phone is a wannabe attempt by LG for a iPhone killer. Its got an elegant look about it though and relies wholly on the touch interface.
 But, without 3G & Wi-fi it doesn't make its presence felt much against competitors. It'll satiate your hunger for good looks though.
LG Dare
 The LG Dare is yet another LG hit at the iPhone.
 Its a good enough cell with a 3.2MP cam, 3G & 240X400 screen.
Its been launched for just $200 so actually it its quite affordable as compared to other phones in its league.
The only hiccup is the absence of Wi-fi.
===========
This list is still not complete. The iPhone has propelled the Touch Screen revolution to new heights! Nobody wants to be left behind in this race. All manufacturers are battling big time to catch the attention of the touch screen loving market. Other noteworthy iPhone killers include the Philips X800, the Blackberry Thunder & the O2 XDA Orbit.But I think, the Touch Diamond and the Sony Xperia will give the iPhone the toughest competion.
Well now to be fair to the iPhone, the touch interface of the phones mentioned above doesn't come close to the iPhone. When it comes to the design, UI & navigation simplicity the iPhone wins hands-down. But then, once the novelty of the touch-screen wears off, users like me who bank on the features rather than the design of the phone, are gonna be disappointed because the iPhone lacks lots of stuff that the "iKillers" have!
But still, I don't believe that the iPhone will really get "killed". When the iPod launched, there was a flurry of music players launched in quick succession claiming to be iPod killers. However, as we all know, the iPod is still very much alive & kicking! I'd say that these other phones do offer alternatives to the iPhone & also give them tough competiton. Hopefully , Apple will take a hint from the "killers" and incorporate all the missing features in its next release. That'll be something to look forward to!
Tuesday, July 1, 2008
Remove ads in Yahoo! Messenger
As it is, Yahoo messenger has a small window to display your IM contacts [considering the fact that you don't maximise the window] . To add to this, Yahoo has these irritating ads which even pop-up somtimes and occupy a considerable part of that window. There's a easy way to remove these ads from Yahoo Messenger.
[NOTE: You won't be ale to use the chatroom feature once you disable these ads. So don't try this if you use the chatroom. ]
First of all find out which version of messenger your using. Simply open Yahoo Messnger & on the top toolbar select Help -> About. If your version is 8 then the procedure is just a 2-second thing
First, exit Messenger. Then Download this *.bat file from HERE to your computer. Now simply double click to execute it. You'll see a command prompt window pop up temporarily. And thats all. When you start Messenger, you wont' see those ads.
Here's what the .bat file actually does-
It modifies the following registry entries located at HKEY_CURRENT_USER\Software\ Yahoo\pager\YUrl by replacing the values with an asterik (*)
-Messenger Ad
-Webcam Upload Ad
-Webcam Viewer Ad
-Webcam Viewer Ad Big
-Webcam Viewer Ad Medium
-Change Room Banner
-Conf Adurl
- Chat Adurl
You'll have to repeat this procedure if you update or reinstall messenger.
======
If your using Yahoo Messenger 9.0 , then the above method won't work. Try this instead-
1. Exit Messenger
2.On your comp, navigate to C:\Program Files\Yahoo!\Messenger\YahooMessenger.exe and create a backup copy of YahooMessenger.exe
3.Download a hex editor like HxD from HERE. Extract the setup file using WinRAR and install the software.
4.Launch HxD. Go to File->Open and navigate to C:\Program Files\Yahoo!\Messenger\YahooMessenger.exe in the hex editor.

5.Now click on Search-> Go To and go to the offset 295928 .
6. Look at the right column and replace y from “y.m.s.g.r.a.d.s” with p
7. Next save the file from File->Save and close the hex editor.
Your done. The next time you start messenger, you shouldn't see those animated ads.
=======
Now, with the latest beta update, even the hex editor hack doesn't work here's another way-
1.Close Yahoo Messenger.
2.Now, on your computer, browse to C:\Program Files\Yahoo!\Messenger\Cache.
3.There will be a file by the name urls.xml here.
4.Open it in notepad and delete all the text from it. Now save the file.
5. Then right-click on it and select Properties. Here, tick the 'Read-only' check box.
6.Now download the Patch from HERE. {Please virus scan this file after download because some people have reported trojans. Download at your own risk}. Run the file and click Patch . If it gives up a pop-up saying “Can not find the file. Search the file?”, then click Yes and show the path of your yahoomessenger.exe file. Now click on patch. After it says patching is done, the bottom banner ad in Messenger should be removed.
========
Another trick-
1. Open Notepad.
2. Choose File->Open and go to the following file:C:\Windows\system32\drivers\etc\hosts
3. Add the following line at the end of the text file and save it:
127.0.0.1 insider.msg.yahoo.com
This will disable the ads, but please note that it might also prevent Yahoo from loading IMVirons & Audibles.
Credits to thenonhacker for this trick.
==========
The last alternative to remove ads is to use a software like Yahoo Ad Banner Remover which removes ads from version 7.5 & 8. Download from HERE. It also allows you to run multiple instances of messenger.
One more software is Y.AddsRemover. Download from HERE. Just run it, select all and say 'Remove Selected Ads'
Another software is Ad Destroy. Check it out HERE.
Those are all the ways known till now to disable ads in Yahoo Messenger.
Disclaimer: Please note that you will be violating Yahoo! terms & policies by disabling ads.
Friday, June 27, 2008
Easy steps to speed up your net!
Well, to be honest, there is no way that you can directly just boost your net speed apart from purchasing a better net package. But then, there are ways you could boost the rate at which pages load while browsing the internet and make pages load faster for you, thereby "supposedly" making your net faster.
The following tweaks may not make much of a difference to net-users who already have a fast net connection. Anyway, no harm trying these tweaks out.
To start of, Mozilla users can boost the rate at which pages load with a slight tweak in the Mozilla settings. And now with Mozilla 3 available, it's even faster. Anyway, here's the tweak for Broadband users to speed up Mozilla.
1. Start Mozilla, and enter about:config in your address bar.
2. Scroll down and look out for the following settings: 
i. network.http.pipelining
ii. network.http.proxy.pipelining
iii. network.http.pipelining.maxrequests
3. Double click network.http.pipelining to set it to true. By doing this your firefox browser sends multiple requests to a  website.
Similarly, double click network.http.proxy.pipelining to set it to true.
Then, double click network.http.pipelining.maxrequests and reset the integer value to 30. This forces your browser to send  30 requests simultaneously to a website.
Finally, right-click anywhere on the screen and select New->Integer. Enter the name as: nglayout.initialpaint.delay and set it's value to 0.
Your done! Restart your browser and you should notice pages loading considerably faster.
For IE users, you could use the following tweak. What this tweak does is it allows you to load several pages parallel(at the same time) under different tabs or windows.
By default IE sets the limit of parallel conections to a website very low. You can edit this limit, therebyy parallel-loading webpages to a higher level.To do this, we've got to edit Windows registry. You've got to be careful doing this and backup your registry if you can to be on the safe side.
1. Go to Start->Run. Type regedit in the textfield and hit enter. That should start Windows Registry Editor.
2. Navigate to HKEY_CURRENT_USER\SOFTWARE\MICROSOFT\WINDOWS\CURRENTVERSION\INTERNET SETTINGS\

3. Right click on the white-space in the window on the right and select New->DWORD Value.
Enter MaxConnectionsPerServer as the string name. Repeat the process, this time entering MaxConnectionsPer1_0Server as the string name.

4. Now right-click on the MaxConnectionsPerServer and select Modify. Edit the value to Decimal(check Decimal in the Base window) - 6.
Repeat the same for MaxConnectionsPer1_0Server, this time editing the value to Decimal - 8.

Your done!
Now, there's one last thing. Microsoft reserves 20% of your bandwidth for certain sites to access. You could change these(QoS Packet Scheduler) settings to disable this. However, results may vary for different users. I've gone through a lot of reviews on this tweak and the results haven't been all in favour of the tweak. However, do try the tweak out and see if it helps.
There are two ways you could do this.
You could just go to Control Panel->Network & Internet Connections->Network Connections. Browse to the connection you are using, right click on it and select Properties.
There, just disable QoS Packet Scheduler by unchecking the box.
Alternatively, you could follow the following steps.
1. Go to Start->Run. Enter gpedit.msc and hit enter.
2. Navigate to Computer Configurations->Administrative Templates->Network->QoS Packet Scheduler.
3. On the right-side of the window, click on Limit Reservable Bandwidth. Choose Enable and edit the value to 0%. Click Ok.
Your done!
Credits to Rebeck Carvahlo at http://internetpcguide.blogspot.com/ . I first learnt about this tweak from there.
Thats it for now. However there are further tweaks, for high speed connections involving the use of CableNut and other such softwares. I'll try coming up with a guide for that later.
Till then, enjoy this one, Cheers!
Tuesday, June 24, 2008
Convert an AVI file to DVD
I've got lots of stuff in AVI format on my comp...movies, music vids, digicam/handycam vids...blah blah..... And quite often, I want to watch these movies on my TV rather on on the 17" monitor screen. Now, the new DVD players in the market support AVI format file playback. So, you can just make a data CD/DVD with the files you wanna watch. But, the older players just play normal CD's & DVD's. They are incompatible with AVI files. But, no sweat! There's a very simple & FREE way of converting your AVI file into a DVD so that you can enjoy it on your TV.
First of all, we need a video converter that'll convert the AVI file to DVD format. I've searched around the net a lot and I've found a couple of good converters that are also free. I've listed them here-
1.DVD Flick - Download it from HERE
2.Avi2DVD - Download from HERE
3.SUPER (Simplified Universal Player Encoder & Renderer ). Download from HERE
Besides AVI, these softwares can also be used to convert files of other formats.
You may find many other converters (Xilisoft, Cucusoft, ConvertX) if you google for them, but, most of them will be shareware or trial which will convert only a certain percentage of the file or have a time limit or have a watermark on the output file. After a lot of searching, these were the good softwares I've come across.
I've illustrated the actual conversion process using DVD Flick which I find the simplest to use.
1. Download and install DVD Flick from the link I've provided above. Launch the program.
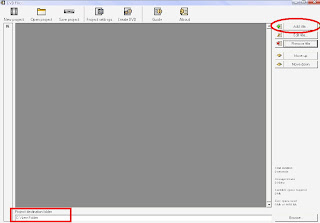 2. The main window looks like the pic alongside. At the bottom left corner, choose the directory where you want the final DVD format output file to be stored. Now, at the top right corner, click on 'Add Title'. Browse for the AVI file on your hard-disk and press OK. I would recommend burning only 1 file on 1 DVD if its a movie file [700MB]. Its not advisable to burn more than 800MB on 1 DVD because when the software converts the file to AVI format, the 700MB file automatically gets bloated up to a 4.2GB file.
3.You can edit the file by selecting it and clicking the 'Edit title' button which is just below the 'Add title' buttuon. Now, the properties window will be displayed. Use the tabs to change any properties you want.
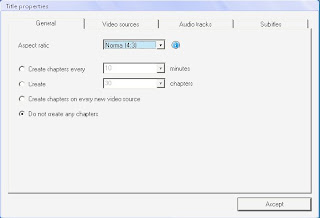
General Tab: Allows you to set aspect ratio [choose 4:3] and create chapters.
Video Tab: Add/remove videos
Audio Tab: Add/remove audio tracks
Subtitles: Add subtitles
Edit anything you want here and there click 'Accept'
4.
 Once, your done editing, click on 'Project Settings' on the toolbar at the top.
 Once, your done editing, click on 'Project Settings' on the toolbar at the top.
 Now, you will be provided with another window-
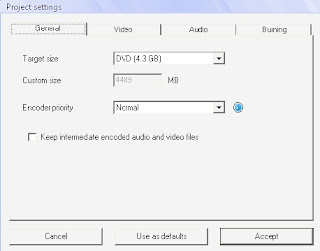
I'll explain the tabs here-
General Tab: Choose the size of the DVD you're gonna burn to. [normally its 4.3GB]. Leave the encoder priority at 'Normal' if you want to use the computer for other work while converting. Else, you can change the priority to 'High'. [This will use lot of RAM]
Video Tab: Here, you just need to decide whether the target format should be PAL or NTSC. In most cases, its NTSC. The best way to see this is if the video runs at 25 frames per second, it is PAL & if it runs near 24 FPS or near 30 FPS it will be NTSC.
Audio Tab: Let the target format remain at 'Auto'
Burning Tab: Here, you can choose whether you want to burn the converted files to a disc or not. If you choose to burn to disc, DVD Flick will automatically author you a DVD. Otherwise, if you select 'Create an ISO' then an ISO format file will be created and stored on your hard-disk which you can later burn using a software of your choice like Nero.
Once your done, click on 'Accept'.
5.Next, in the main window, click on 'Create DVD' which is right next to 'Project Settings'. That's it, your done! Now just let the encoder do its work. Conversion is normally a lengthy process and will take a couple of hours.
General Tab: Choose the size of the DVD you're gonna burn to. [normally its 4.3GB]. Leave the encoder priority at 'Normal' if you want to use the computer for other work while converting. Else, you can change the priority to 'High'. [This will use lot of RAM]
Video Tab: Here, you just need to decide whether the target format should be PAL or NTSC. In most cases, its NTSC. The best way to see this is if the video runs at 25 frames per second, it is PAL & if it runs near 24 FPS or near 30 FPS it will be NTSC.
Audio Tab: Let the target format remain at 'Auto'
Burning Tab: Here, you can choose whether you want to burn the converted files to a disc or not. If you choose to burn to disc, DVD Flick will automatically author you a DVD. Otherwise, if you select 'Create an ISO' then an ISO format file will be created and stored on your hard-disk which you can later burn using a software of your choice like Nero.
Once your done, click on 'Accept'.
5.Next, in the main window, click on 'Create DVD' which is right next to 'Project Settings'. That's it, your done! Now just let the encoder do its work. Conversion is normally a lengthy process and will take a couple of hours.
Once the DVD is burnt, you can watch it on your TV. Enjoy!
Subscribe to:
Posts (Atom)


 Posts
Posts


